
The Hole Thing
 Take away a camera’s mount, viewfinder, electronics, optical system (including lens), and case, and what’s left? It’s not “nothing;” it’s a hole. Holes treat light very differently from the way nothing treats light, and the image business is very much involved with light. One of the key effects of holes on light is diffraction.
Imagine a small road, a two-lane highway. Imagine that there’s a lot of traffic on it, but it’s moving nicely, as fast as anyone would like to go. Now imagine that the highway suddenly expands from two lanes to four (or six or eight). What happens? In my experience, the cars from the two-lane highway, even though they are moving as fast as their drivers would like, will spread out into the newly available space.
Light does something similar. It is bent by edges. The phenomenon is called diffraction. Sean T. McHugh’s CambridgeInColour photography site offers an excellent interactive tutorial on the subject here: http://www.cambridgeincolour.com/tutorials/diffraction-photography.htm Many of the illustrations in this post are taken from that site (with permission).
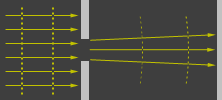
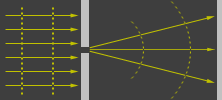 As can be seen from these images, a big hole bends light less than does a small hole. Think of a 12-lane highway expanding into a 14-lane; cars won’t spread out as much as when a two-lane highway expands into a 14-lane.
 Now consider the diagram on the right above. Each arrow, each ray of light, may be considered to be consist of waves. If the center arrow hits the wall at the right at the peak of a wave, it’ll make a bright dot. One of the bent rays might hit the wall at the same instant at the trough of a wave, resulting in a dark ring (a ring because the hole is two dimensional). The resulting diffraction pattern is called an Airy disk. As two Airy disks overlap, the dark part of one might be co-located with the bright part of another.
As a result, the dark gets brighter and the bright gets darker, a loss of contrast, and contrast is essential for sharpness. If they overlap enough, they no longer look like two disks but one. At that point, when individual pixels can’t be distinguished, resolution is lost.
There’s a fairly simple equation for determining the amount of contrast loss caused by diffraction:
MDMTF = 1 – (1.22 * λ * f * lp/mm)
MDMTF is monochromatic diffraction-limited modulation transfer function, or how much of the original contrast survives the diffraction, λ is the wavelength of the light used for the calculation, f is the F-stop of the aperture, and lp/mm is the linear resolution in line pairs per millimeter. Actually, the most important part of the equation is “1-” because it means that unless something between the parentheses is zero contrast will be reduced, and nothing inside the parentheses can be zero.
If you’ve been shooting video professionally since before the advent of HDTV, you’re probably wondering why no one raised diffraction as an issue before. That’s because it didn’t really matter.
The width of a 2/3-inch-format image sensor for 4:3-aspect-ratio pictures is 8.8 mm. The standard-definition serial-digital maximum resolution is 720 active samples per line, which would be a bit less than 41 lp/mm. Red light diffracts more than blue, so let’s pick a wavelength of 0.00063 mm. Under those conditions, resolution would not be lost until almost f/32. At a more common f/4, the contrast permitted by diffraction at maximum resolution would be more than 87%, a very respectable number.
Now consider 1080-line HDTV. The same image format has a sensor width of 9.6 mm in a 16:9 aspect ratio, and 1920 active samples per line, therefore, yields a linear resolution of 100 lp/mm. Now diffraction-limited resolution starts to drop at f/13, and maximum-resolution contrast at f/4 is less than 70%. If it’s a 1/3-inch-format 1080-line HDTV camera, resolution loss begins at about f/6.5, and maximum-resolution contrast at f/4 would be less than 39%.

 Those are just words and num-bers. What do the effects look like, as a practical matter? These pictures were shot with a Canon EOS 20D still-picture camera, with an image sensor 22.5-mm wide with 3520 active pixels across. The one at the left was shot at f/8 and the one at the right at f/22. Translating both size and resolution, those are roughly equivalent to f/6.2 and f/17 in a 2/3-inch-format 1080-line HDTV camera and f/3.1 and f/9.5 in a 1/3-inch format. You might want to zoom in on them.
Diffraction clearly has an effect on image sharpness, and it’s worse at higher f-numbers. So why not shoot at wider apertures? Unfortunately, diffraction isn’t the only effect of a hole on light. There are also lens aberrations. They are not easily calculated for multi-element lenses, but most of them increase in proportion to the size (or square or cube of the size) of the hole. Small holes mean less sharpness due to diffraction, and big holes mean less sharpness due to lens aberrations. To see the effects, it’s worth turning to another excellent photographic tutorial, this time on the Bob Atkins Photography site: http://www.bobatkins.com/photography/technical/diffraction.html
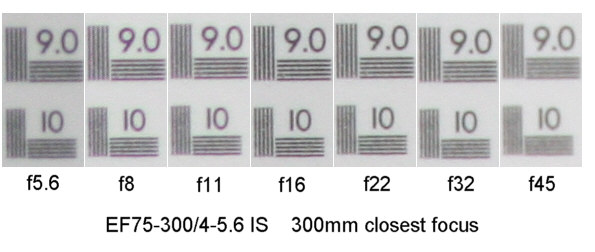
These images (also used with permission), also shot with an EOS 20D, show optimum sharpness at neither the maximum nor the minimum lens aperture. You might want to experiment with your own camera(s) to find the optimum-sharpness aperture for your camera-lens combination. You can then try to use it by adjusting lighting and using filters.
Someday, I hope to tell you some more about image-sensor formats and HDTV optics. If good pictures don’t make it to the sensor, they won’t come out of the camera.
Tags: aberrations, cameras, contrast, diffraction, HDTV, optics, Resolution, sharpness,
No comments yet. You should be kind and add one!
The comments are closed.